If your home already features a proper electrical outlet but your oven arrives hardwired, knowing How to Convert a Hardwired Oven to a Plug‑In Oven can save you time, money, and hassle during installation. At Expert Electric, our certified electrical pros specialize in exactly this. We expertly guide homeowners through every step, from safety precautions to final testing, ensuring a seamless, code-compliant transition.
Many homeowners are surprised to learn that not all ovens are plug-and-play. Some appliances come factory-equipped to be hardwired directly into the home’s electrical panel, which can be problematic if your home already features a standard 240-volt outlet. Retrofitting the oven with a compatible plug is not only possible but often a more convenient and cost-effective solution. However, this process must be handled carefully and in strict compliance with safety codes to avoid fire hazards or electrical failure.
The process of converting a hardwired oven to a plug-in oven allows for greater ease of maintenance and the ability to disconnect power without accessing a circuit breaker. While some seasoned DIYers may be able to perform the conversion, the majority of homeowners are better off enlisting a licensed electrician, especially since mistakes can result in code violations or even severe injuries.
In this guide, we’ll walk through the key steps to help you understand what’s involved in the conversion and whether you should tackle it yourself or call in the pros. For an additional reference, check out this detailed guide by Sagan Electric.
Why Convert a Hardwired Oven to a Plug‑In Oven?
Converting a hardwired oven to a plug-in model offers numerous benefits that go beyond mere convenience. First and foremost is flexibility. With a plug-in oven, moving or replacing the appliance becomes significantly easier. Whether you’re undergoing a kitchen renovation, upgrading appliances, or simply rearranging your space, having a plug instead of a hardwired connection means you can unplug and move the oven without needing an electrician every time.
Another compelling reason is serviceability. If your oven needs repairs or maintenance, having a plug-in model allows a technician to isolate the appliance without cutting power to an entire circuit. This minimizes downtime and inconvenience, especially in busy households where the oven is a daily necessity. A plug-in connection also facilitates easier troubleshooting and voltage testing during repair visits.
Then there’s the aspect of safety and compliance. Modern building codes in many areas now favor plug-in appliances with proper grounding over hardwired connections. In some regions, new electrical installations must use a 4-prong grounded outlet instead of older 3-prong types. A plug-in conversion, done correctly, can bring your kitchen up to current standards, helping to ensure the long-term safety of your electrical system.
Finally, there’s the cost-effectiveness. If your home already has a 240V outlet installed, converting the oven to match the outlet is generally more affordable than installing new wiring or modifying the breaker panel. This is especially true in older homes where major electrical work can quickly escalate in complexity and cost. You can read more about cost considerations and code compliance in this article by Penna Electric.
Step-by-Step Guide: How to Convert a Hardwired Oven to a Plug‑In Oven
1. Safety First
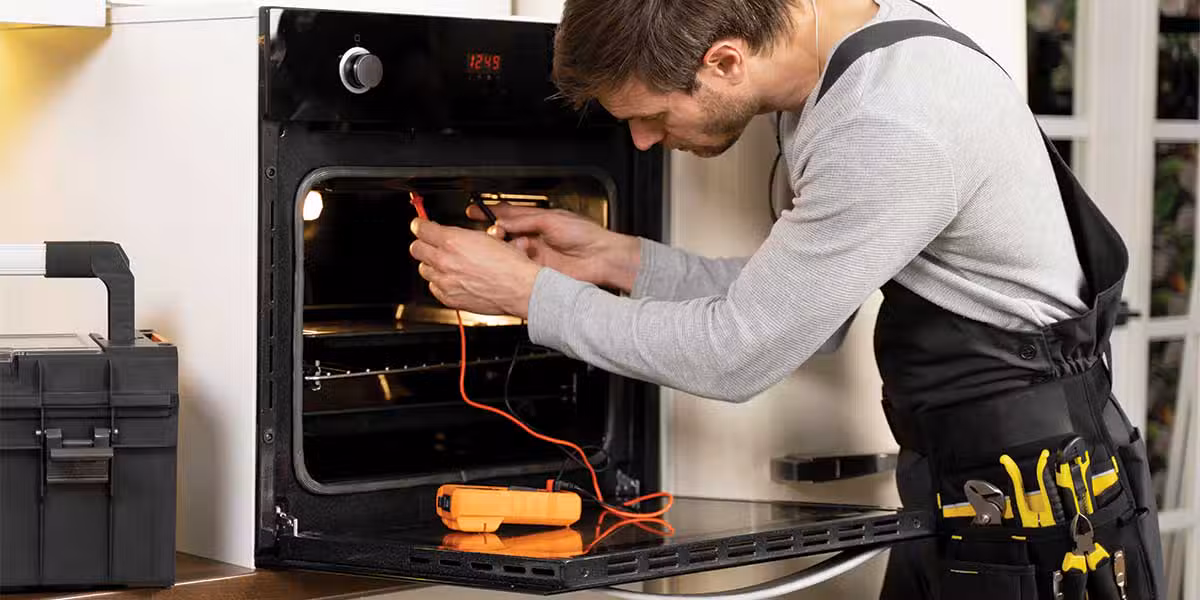
When working with high-voltage appliances like ovens, safety is paramount. The process of converting a hardwired oven to a plug-in unit begins by turning off the power at the circuit breaker. Once you’ve flipped the breaker, use a non-contact voltage tester to double-check that there is no power at the connection points. Failure to do so can lead to serious injury or even death.
Never assume that turning the appliance off is sufficient. Residual voltage can still pose a risk. Always wear insulated gloves and safety goggles, and be cautious around exposed wires. If at any point you feel unsure about your knowledge or ability to safely proceed, stop and contact a licensed electrician. The cost of professional help is insignificant compared to the risks of improper installation.
Also, be mindful of building codes in your region. Electrical work must adhere to local regulations, which may dictate whether a permit or inspection is required. Improper or non-compliant installations may void your appliance warranty or even your homeowner’s insurance in the event of a fire.
Remember: this is not just a plug swap. You are modifying an appliance that draws significant power and must be properly grounded and connected to avoid hazards. Safety is not optional; it is the foundation of every step in this guide.
2. Assess Your Oven and Electrical Setup
Before diving into the actual wiring, take the time to thoroughly evaluate your oven and your home’s electrical outlet. Start by locating the oven’s metal ID plate or label, typically found on the back or inside the door. This tag lists essential information such as voltage, amperage, and model number. Compare this data with your existing 240V outlet and circuit breaker specifications.
If the amperage or voltage ratings do not match your circuit, do not proceed. This could be a sign that the oven is incompatible with your home’s current wiring. At this point, you should contact a certified electrician to determine whether an electrical upgrade is needed.
Next, determine what type of outlet you have: a 3-prong or 4-prong. A 3-prong outlet has two hot wires and a combined ground/neutral, while a 4-prong outlet includes two hot wires, one neutral, and one ground—a much safer and now-standard setup. Depending on your plug type, you’ll need to choose the appropriate replacement plug head for the oven.
You’ll also need to inspect the wire gauge and condition of the existing oven cord. If the wires are frayed, brittle, or otherwise damaged, you should not reuse them. Purchase a high-quality, UL-listed cord rated for your oven’s amperage and voltage. Assessing these details upfront ensures that the conversion goes smoothly and safely.
3. Separate and Strip the Oven Wires
Once you’ve confirmed compatibility, it’s time to prepare the oven wires for connection. Start by carefully cutting back the oven’s existing cord, ideally removing the hardwired junction box connection. Using a utility knife or wire stripper, expose the individual conductors inside the cable: typically two hot wires (black and red), one neutral (white), and one ground (green or bare copper).
For a 4-prong plug, all four conductors are used. If you are connecting to a 3-prong plug, the neutral and ground are typically bonded together, though this configuration is now outdated and often no longer code-compliant. It’s essential to understand your local electrical code before proceeding with a 3-prong setup.
Carefully strip about three-quarters of an inch of insulation from the end of each wire using a wire stripper. Make sure you don’t nick the copper, as damaged strands can weaken the connection and generate heat.
Label each wire with color-coded electrical tape or tags to avoid confusion when attaching them to the new plug. If the oven cord is too short to reach the outlet after conversion, consider installing a junction box and running an approved appliance cord to extend the reach.
Being methodical at this stage sets you up for a safe and secure plug installation. Double-check your work before proceeding.
4. Attach and Secure the New Plug
With your wires stripped and labeled, it’s time to install the plug head. Begin by unscrewing and opening the casing of your new 3-prong or 4-prong plug, revealing the internal terminals. Insert each conductor wire into its corresponding slot, hot wires to hot terminals, neutral to neutral, and ground to ground. Make sure to follow the manufacturer’s wiring diagram closely.
Use a screwdriver to tighten each terminal screw securely, ensuring there’s no exposed copper wire outside the terminal clamp. Loose connections can lead to arcing or overheating, posing serious risks. Once all wires are tightly secured, gently tug on each to confirm they’re locked in place.
Next, bundle the wires together neatly and wrap the interior portion where the cable meets the plug casing with electrical tape for added durability and insulation. Carefully reassemble the plug casing, ensuring the strain relief clamp is tightened to prevent wire slippage.
Inspect the completed plug thoroughly. The housing should be tight, the cord should not shift within the plug, and no wires should be visible. Once done, the oven is ready to be connected to the wall outlet but not before one final test.
5. Test the Installation and Plug It In
Now that the new plug is installed, it’s time for a crucial final step, testing. Before plugging your oven into the outlet, use a voltage tester or multimeter to ensure the wiring is accurate. Confirm that the hot, neutral, and ground terminals correspond correctly, and that the voltage output matches the oven’s requirements.
Once verified, plug the oven into your 240V outlet. Power on the circuit breaker and observe the oven’s behavior. If it powers on without issue, run a brief test cycle or set the oven to a low heat setting to confirm it operates as expected.
Monitor the plug for a few minutes to ensure it doesn’t get excessively hot. A properly installed plug should remain cool during operation. If anything feels unusual, flickering display, tripped breaker, or heating issues, immediately shut off the circuit and call a licensed electrician.
A thorough test confirms the safety and reliability of your conversion. It’s the final safeguard before using the oven regularly, and it should never be skipped. With everything running smoothly, you’ve successfully converted your hardwired oven into a modern, service-friendly plug-in appliance.
FAQs: How to Convert a Hardwired Oven to a Plug‑In Oven
Q1: Can I safely convert any hardwired oven to a plug-in oven?
A1: It depends on the compatibility between your oven and home’s electrical system. The voltage and amperage ratings on your oven must match the specs of your outlet and circuit breaker. If these values differ, you risk overloading the circuit or underpowering the appliance. Converting a hardwired oven to a plug-in oven is not always a DIY project, especially when working with 240V circuits. If you’re not confident in understanding electrical schematics or local building codes, it’s best to hire a licensed electrician to evaluate and safely carry out the conversion.
Q2: Should I use a 3-prong or 4-prong plug for the conversion?
A2: A 4-prong plug is generally safer and compliant with current electrical codes. It includes two hot wires, a neutral wire, and a dedicated ground wire. This setup minimizes the chance of electrical shock and ensures safe grounding. Older homes may still have 3-prong outlets, which combine ground and neutral, a method no longer supported by updated safety codes. If you have a 3-prong outlet, consult with an electrician about upgrading to a 4-prong configuration.
Q3: Is it okay to convert the oven myself?
A3: Only if you have a thorough understanding of high-voltage appliances, wiring standards, and local codes. Mistakes during the conversion process could result in fire hazards, electrical damage, or personal injury. For peace of mind and compliance, we highly recommend working with certified professionals like the team at Expert Electric.
Q4: Will converting my oven affect the warranty?
A4: It might. Some manufacturers explicitly state in their warranties that unauthorized modifications or installations can void coverage. Always review your oven’s warranty information before proceeding and consider contacting the manufacturer’s support line to confirm. If you’re hiring a professional for the job, make sure they are licensed and provide documentation of the work performed.
Q5: Are there tools I should have before starting?
A5: Yes. At a minimum, you should have a voltage tester, insulated screwdriver set, wire strippers, electrical tape, and a UL-listed plug compatible with your outlet type. Safety gear like insulated gloves and safety glasses is also strongly recommended. Having the right tools ensures you can complete the job accurately and safely.
Final Thought
Converting a hardwired oven to a plug-in version is a smart upgrade that offers flexibility, safety, and convenience. Whether you’re looking to modernize your kitchen, simplify future appliance replacements, or meet updated electrical codes, this transformation can make a meaningful impact. However, as with any high-voltage electrical project, safety and compliance should never be compromised.
The process isn’t inherently complex, but it demands attention to detail and a thorough understanding of wiring principles. From identifying the proper plug type to ensuring secure connections and testing for reliability, every step matters. A plug-in oven setup makes future maintenance easier and gives homeowners more control over their appliances, but only if the conversion is done correctly.
If you’re uncertain about your electrical skills, it’s always best to consult an expert. Mistakes can result in significant safety risks or costly code violations. At Expert Electric, we’re here to provide guidance, execute conversions safely, and ensure your oven functions flawlessly from day one.
Contact Expert Electric
Ready to convert your oven or need help with other residential electrical upgrades? Don’t risk doing it alone, let the experts handle it with precision and care.
Call Us: 604‑681‑8338
Email Us: info@expertelectric.ca
Our licensed electricians are ready to provide safe, code-compliant solutions for all your electrical needs. Schedule your service today and take the first step toward safer, smarter home power.